
How to Wire a Basic Light Switch: A Simple DIY Guide
If you enjoy DIY projects, wiring a basic light switch in Castle Rock is an easy task that can be completed quickly. Whether you’re installing a single pole light switch in Aurora CO or a more complex 3-way switch, we’ve got you covered. Before we dive in, let’s talk about safety. Always turn off the power on your electrical panel before working with any wiring. It’s better to be safe than sorry! Call Today: (303) 790-8813
For a single pole light switch installation, you’ll need the following materials:
– Phillips screwdriver
– Utility knife
– Wire strippers
– Needle-nose pliers
– 15-amp light switch
– Wire nuts
Now, let’s get down to business. Follow these steps to wire your single pole light switch:
1. Remove the cover plate from your existing switch and unscrew the mounting screws with your screwdriver. Here are the zip codes for Littleton in each county: Arapahoe County: 80120, 80127, 80129
2. Carefully pull the switch out of the electrical box, ensuring not damage any wires.
3. Take note of the wires attached to the current switch and their corresponding positions. To be safe, consider labeling them with masking tape or a marker.
4. Use your wire strippers to strip about 1/2 inch of insulation off the ends of the wires. This will expose the bare copper.
5. Disconnect the wires from the old switch by unscrewing the terminal screws or cutting them off.
6. Attach the wires to the new light switch, ensuring they are connected in the same positions. Use your needle-nose pliers to secure them tightly.
7. Take the grounding wire from the switch and connect it to the grounding screw on the electrical box. This will provide an extra layer of safety.
8. Carefully push the switch back into the electrical box and secure it with the mounting screws.
9. Attach the cover plate to complete the installation.
That’s it! You’ve successfully wired a single pole light switch. But remember, if you’re uncomfortable with any aspect of this project or need clarification on your wiring skills, it’s always best to call a professional electrician. Your safety is our top priority.

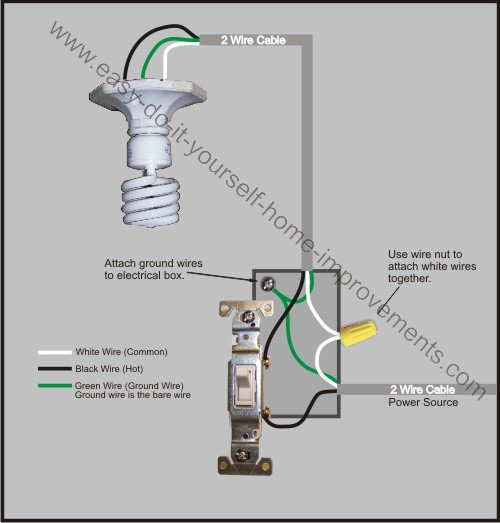
Configuration One: Power to the Switch
In the first configuration, power flows to the switch before reaching the light. This setup includes two black wires (hot), two white wires (neutral), and two bare copper wires (ground) coming from the wall box.
Note: If the wall box is newly installed, you may only see two sheathed white or gray 14/2 wires. To prepare these wires for switch installation, follow these steps:
1. Use a utility knife to score through the middle of the sheathing on both wires, about 6 inches long. Cut off the sheathing and any brown paper found inside. This will reveal the two black wires, two white wires, and two bare copper wires.
2. Use a wire stripper to strip approximately ¾ inch off the tips of all the black and white wires.
Once these preparations are done, follow the steps below to install your light switch (refer to the diagram if needed):
1. Find an additional copper wire and twist it together with the two copper wires using pliers to create a “pigtail.” Once twisted, secure the ends with a wire nut.
2. Twist the two white wires together and secure them with a wire nut.
3. Use needle-nose pliers to grip the end of one black wire and twist it 180 degrees to form a neat loop. Repeat with the other black wire.
4. Attach one of the loops to the contact point on the light switch. Hook the loop around the contact point and tighten the screw clockwise. Ensuring a tight connection is crucial to prevent electrical fires.
5. Repeat the same process with the loop from the second black wire, ensuring a tight connection.
6. There should be one bare copper wire left. Use needle-nose pliers to create a 180-degree loop at its end.
7. Hook the loop you created around the green ground screw at the bottom of the light switch. Tighten the connection.
8. Insert the light switch into the box and secure it with screws at the top and bottom.
9. Turn on the power and test the switch. Once this is completed, follow the steps below to proceed with installation of your light switch (or check out this diagram):
Ready to start your light switch?
Find Pros
Configuration Two: Power from the Lights
For the second configuration, the power is derived from the light to the switch. This is the most convenient configuration for installation. If your electrical box is set up in this manner, you will find one black wire, one white wire, and one bare wire coming from the box.
Follow these easy steps to properly install your new light switch:
1. Connect the bare wire to both the electrical box and the switch.
2. Attach the black wire to the bottom terminal of the switch.
3. Connect the white wire to the top terminal of the switch.
4. Insert the switch into the electrical box and secure it using screws at the top and bottom.
5. Restore power to the circuit and test the functionality of the switch.
Steps for Wiring a 3-Way Light Switch
Installing a 3-way light switch requires more effort than a single pole switch. But with patience and attention to detail, it can be done. There are various wiring configurations for a 3-way switch, such as power to switch to light, power to light to switch, and power to light with two switches.
If you find these configurations too difficult to picture, rest assured you are not alone. For many of these configurations, the best course is to hire a professional to install your 3-way switch to ensure everything is done safely and correctly.
However, one of these configurations, from switch to light to switch, is the most common type of 3-way light switch installation. That configuration is the one that will be explained in detail here.
Important: Remember to cut all power coming from your panel box before beginning any wiring project.
Install Two Switches and a Light Fixture: Step by Step Guide
1. Connect the two bare copper wires in the first box and attach them to the ground nut on the switch.
2. Securely attach the black wire from the power source to the black nut on the bottom right of the switch.
3. Tighten the black wire from the light to the top right nut on the switch.
4. Securely attach the red wire from the light to the top left nut on the switch.
5. Twist the two white wires together and secure with a wire nut.
6. In the light fixture, combine the wires from switch one and switch two. Twist the two bare copper ground wires together.
7. Securely attach the two red wires together with a wire nut.
8. Combine the white wire from switch two with the black wire from switch one. Mark the white wire with electrical tape to indicate it is now a hot wire. Secure with a wire nut.
9. Attach the black wire from switch two to a contact on the light fixture. Then, attach the white wire from switch one to another contact on the light fixture.
10. In the second switch box, attach the black wire from the light fixture to the black nut on the bottom right of the switch.
11. Attach the white wire from the light fixture, which is now the hot wire, to the nut at the top right of the switch.
12. Securely attach the red wire from the light fixture to the nut at the top left of the switch.
13. Connect the bare copper wire to the green nut at the bottom left of the switch.
14. Place both switches into their boxes and secure with screws at the top and bottom.
15. Turn on the power and test the switches.
Hiring a Professional
If you feel confident enough to install light switches on your own, you can save money by doing it yourself. However, if you’re not sure about how to handle any wiring project, it’s best to hire a licensed, bonded, and insured electrician. This will guarantee that your project is completed safely and accurately. Call Today: (303) 790-8813
